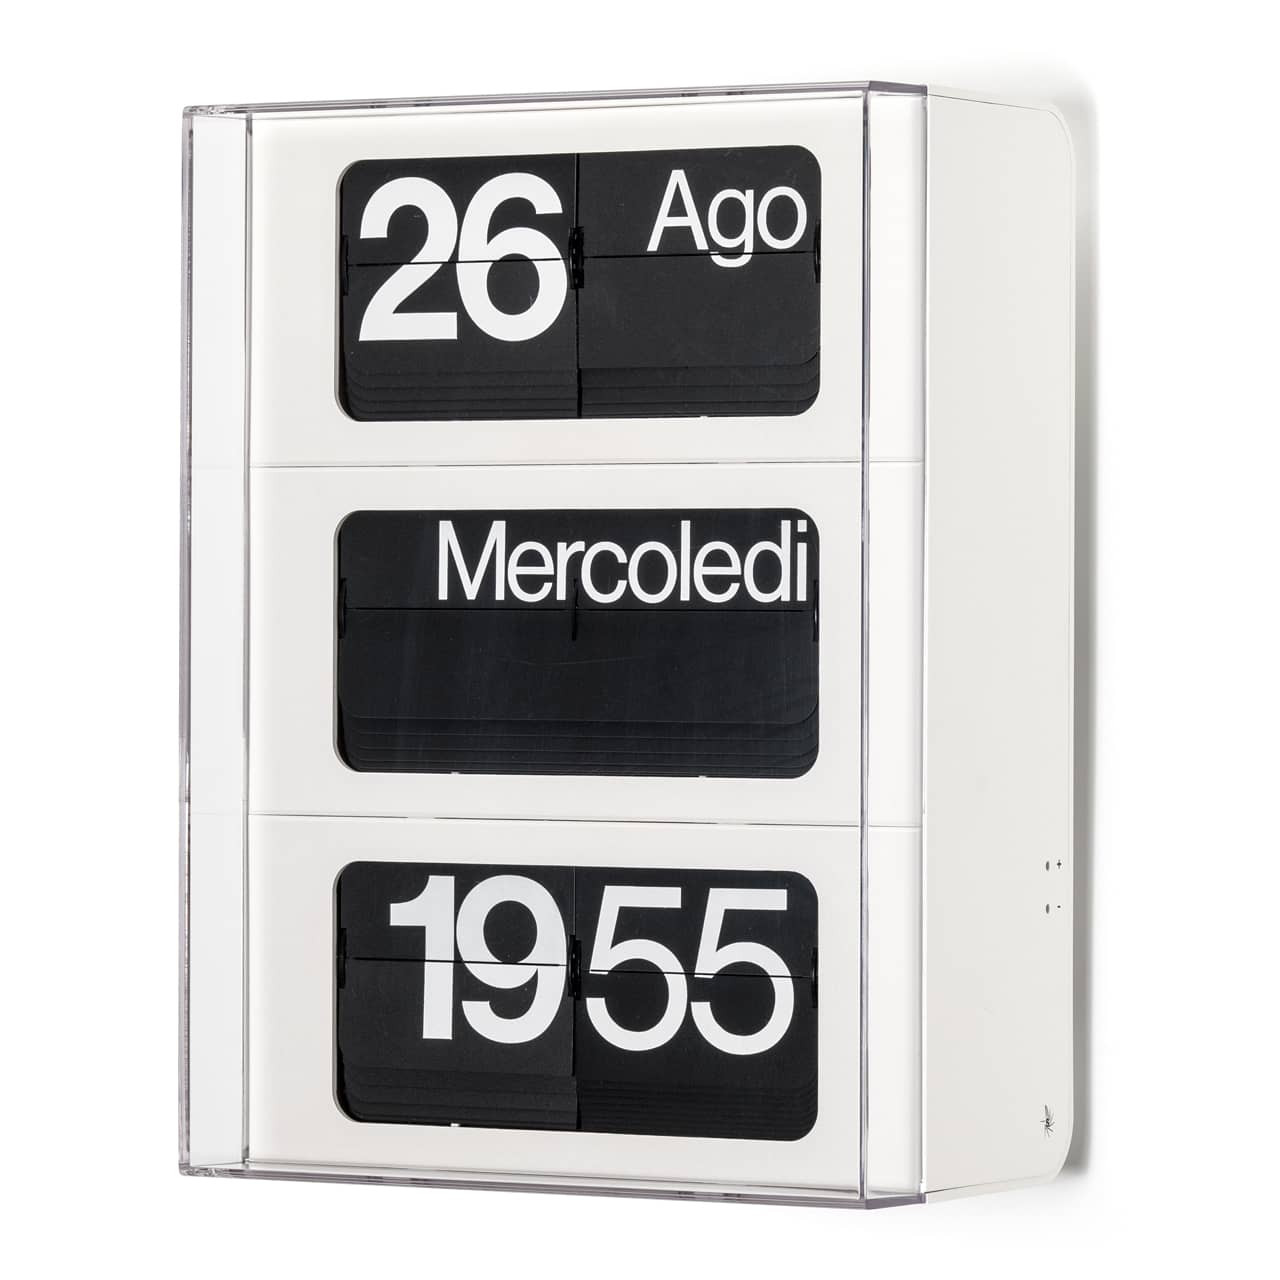


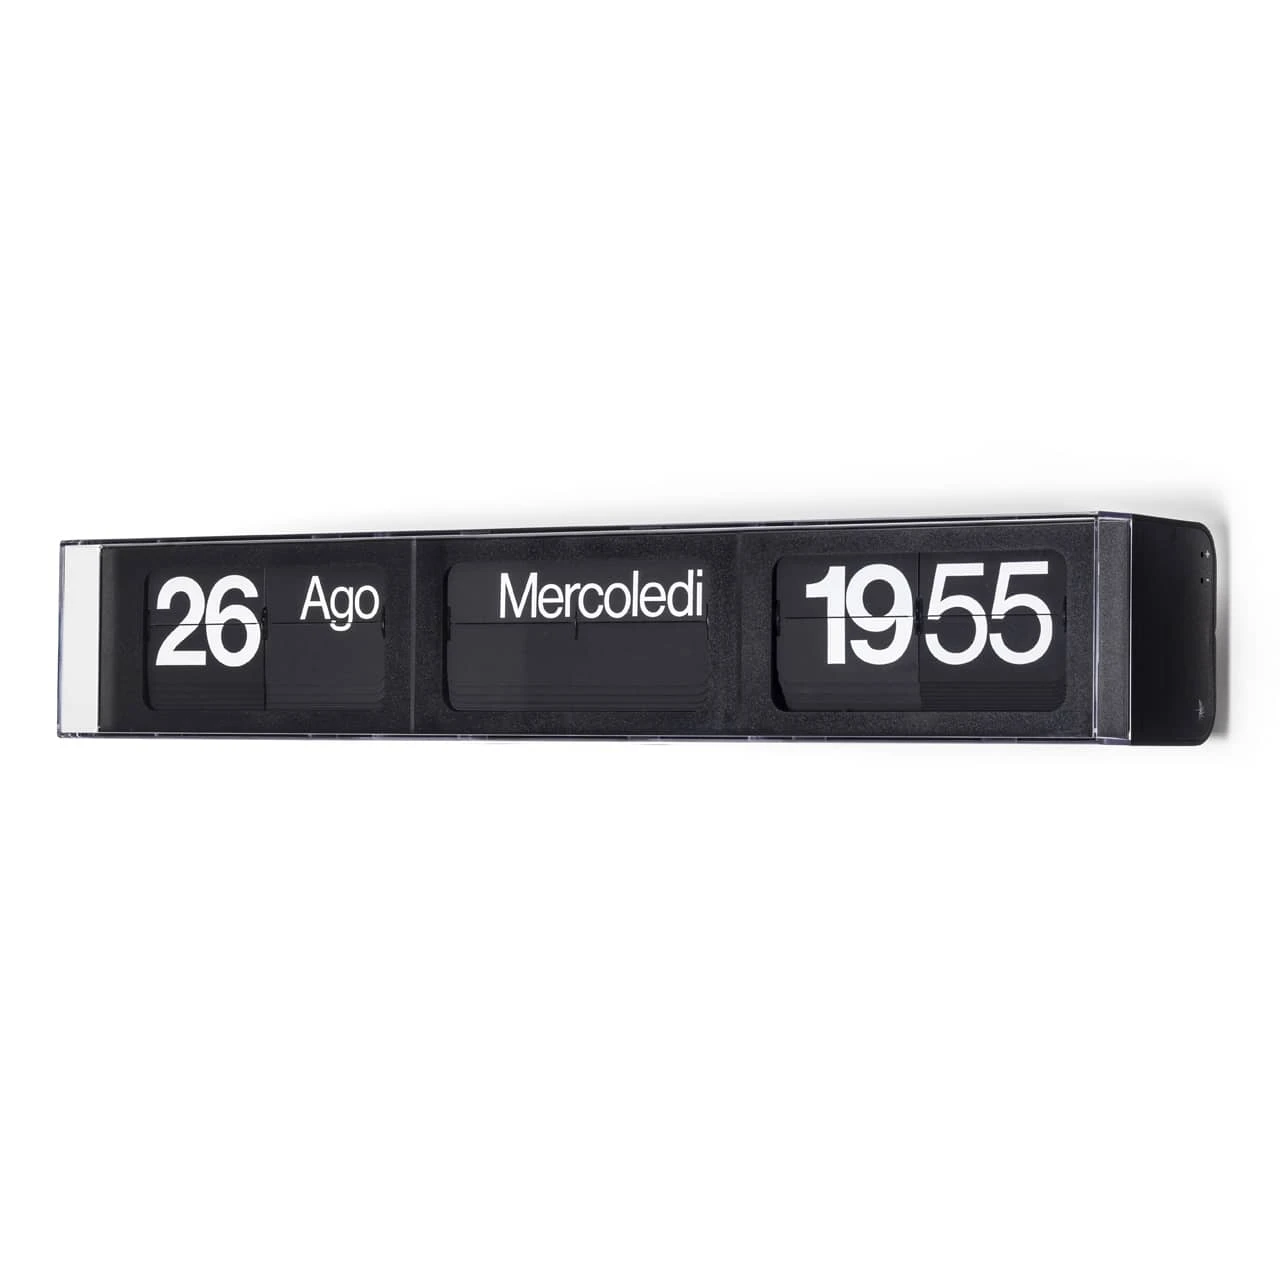
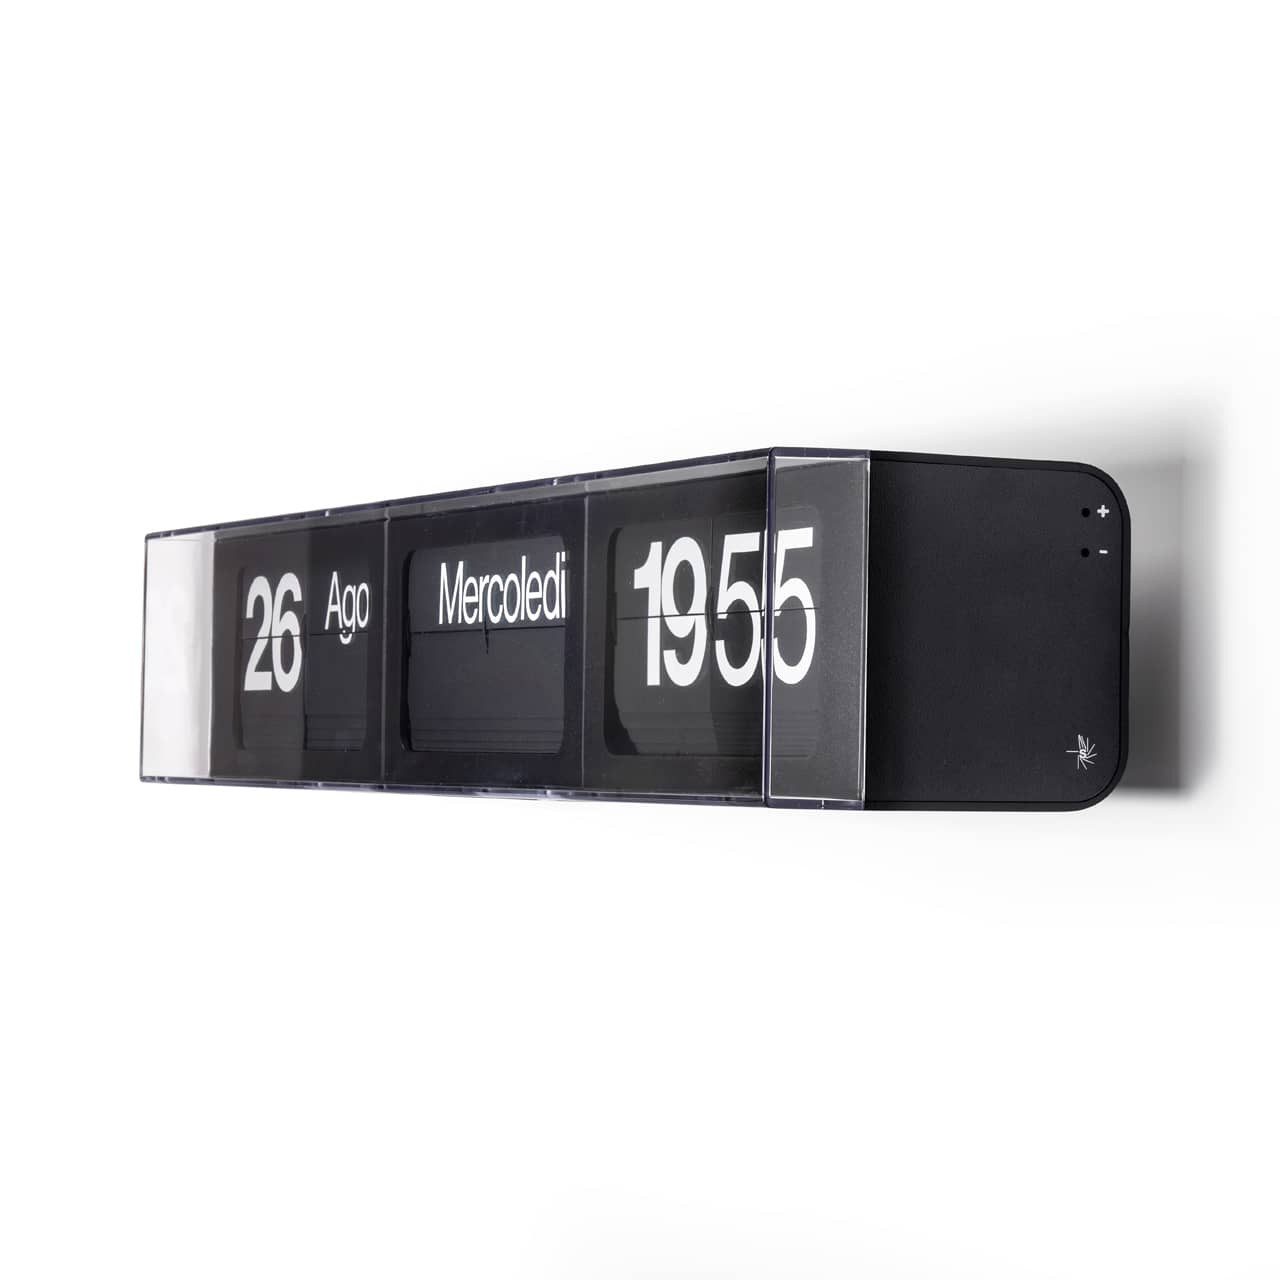


Dator 60 is Solari’s calendar flip clock, introduced in 1965 as the first direct-reading calendar clock: split flaps for the hours and minutes, the day of the week, and the date, with a perpetual calendar that handles leap years on its own. Made in Udine, Italy, it belongs to the same Solari design lineage as the Cifra clocks that helped define the company’s place in twentieth-century Italian design. Solari Lineadesign reintroduced the Dator 60 in 2015 and renewed it in 2026, keeping the mechanism and adding an app and a rechargeable battery.
HOW DATOR 60 WORKS
A stepper motor turns the flap rollers, and each minute the next flap drops into place; at midnight the day and date advance with it. The 2-inch digits are white on black and read from across a large room; the day and month, in 1-inch letters, read from a little closer. The time and date are set from the Solari Lineadesign app over Bluetooth, or by hand with a keypad concealed on the side of the clock. A rechargeable lithium battery, charged through a USB-C cable, runs the clock for about six months per charge, and the quartz timekeeping holds to within about a minute a year. A wall bracket is included.
CHOOSING YOUR DATOR 60
The Dator 60 comes in two orientations and two colors. Horizontal puts everything on one line, 26 inches wide and 4.5 inches tall. Vertical stacks the date, the day of the week, and the time from top to bottom, 13 inches tall and 9.5 wide. Both stand on a table or shelf or hang on the wall. The case is PC-ABS in black or white, behind a clear polycarbonate cover, with the same white-on-black flaps in either color. The clock is built in Italian or in English; the choice sets every word on the flaps, the days as well as the months.
DEALER’S NOTES
We prefer the Italian version; to us, the language is part of the object’s character. It is a heritage piece from Udine, the Italian reads as design rather than translation, and you will know what MERCOLEDÌ and OTTOBRE mean by the second day. The 2026 changes are both good ones. The app is for setup and the occasional adjustment rather than daily use; the Bluetooth connection can take a moment to find the clock, and the first time it does is unexpectedly satisfying. The keypad is there as another option, and the battery charges from a USB-C cable with no fuss. The mechanism is audible from a room or two away. We like the sound, but we would not recommend the Dator 60 for a bedroom: the more flaps that change at once, the louder it is, so the hour is loud and midnight, when the day and date turn over with it, is the loudest moment of the day. Before long you stop hearing it as noise and start hearing it as the hour. Between the two orientations and the two colors there is no better or worse; it comes down to your wall, your shelf, and your taste.
Quick Help & Manual
Download manufacturer manual
- Dator 60 Quick Guide, 2026 model (USB) (pdf, Italian and English)
- Dator 60 Quick Start Guide, 2016 model (D-cell) (pdf)
Not sure which you have? See Which Dator 60 do I have?
Which Dator 60 do I have?
Solari has made two generations of the Dator 60. They appear the same from the front. Check the sides of the case:
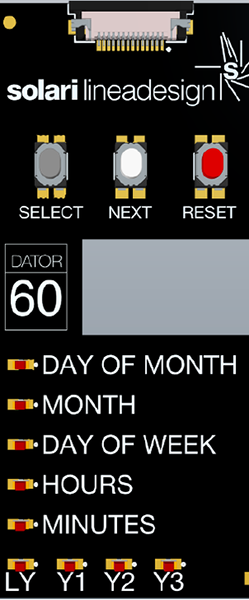
- 2026 model (USB), 2026 and later: a USB-C charging port on the side. Inside the side cover are three buttons marked SELECT, NEXT and RESET, with small lights next to the words DAY OF MONTH, MONTH, DAY OF WEEK, HOURS and MINUTES. It runs on a built-in rechargeable lithium battery and can be set from the Solari Lineadesign app.
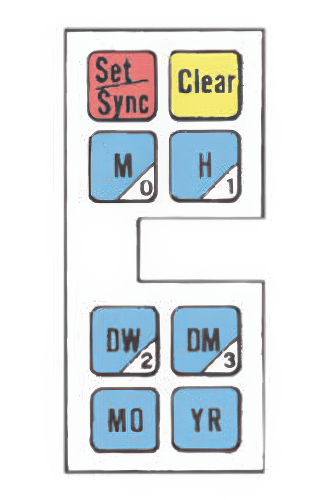
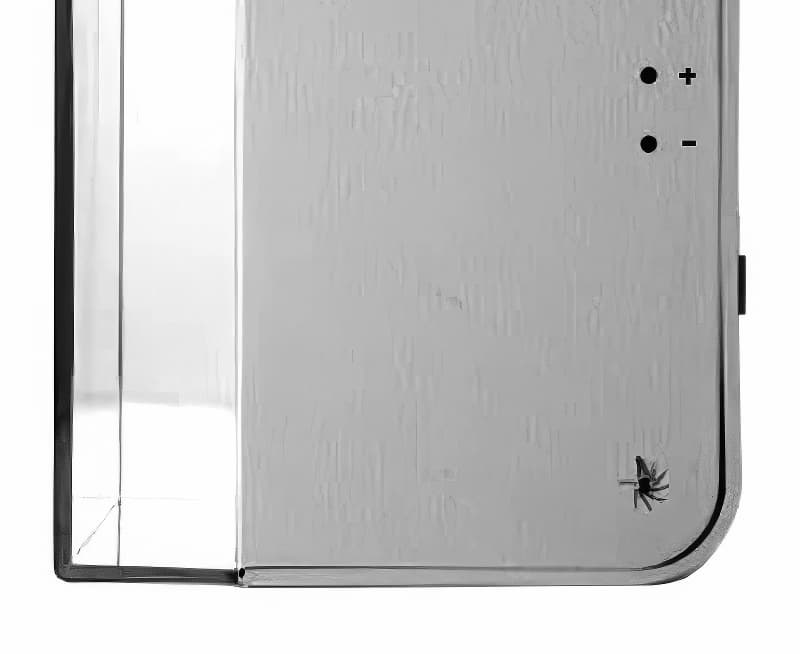
- 2016 model (D-cell), before 2026: a compartment for three D-cell (LR20) batteries behind the side cover, with a keypad of colored keys (red Set/Synk, yellow Clear, blue MO, DM, DW, H, M and YR). Small + and − buttons on the cover change the hour.
The questions below are grouped by model.
2026 model USB / App
Installation
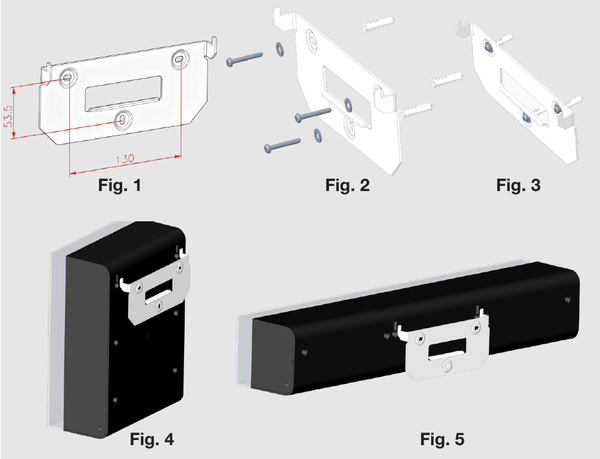
The Dator 60 can stand on a shelf or hang on the wall. Mounting hardware comes in the box (screws, washers, wall plugs and a metal bracket). For indoor use only; keep it out of direct sunlight and away from humid rooms.
- Before installing, make sure there is enough room beside the clock to plug in the USB-C charging cable.
- Use the mounting bracket to align the holes before drilling. We recommend using a level to make sure the bracket is horizontal.
- Fit the wall anchors, then the metal bracket, washers and screws. Tighten until the bracket is firm.
- Hang the clock by sliding the bracket into the slots on the back.
Before you start: removing the shipping pin and switching on
The clock ships with pins that hold the flaps still in transit. Remove the pins before switching the clock on. We recommend keeping the box for a month or two until you are certain the clock is working fine. Store the pins in the box. The vertical clock has a pin on one side only; the horizontal clock has pins on both sides.
- Pull the white tab marked REMOVE until the side cover opens. If it is stiff, use the small access key from the black pouch in the box.
- Slide the pin out.
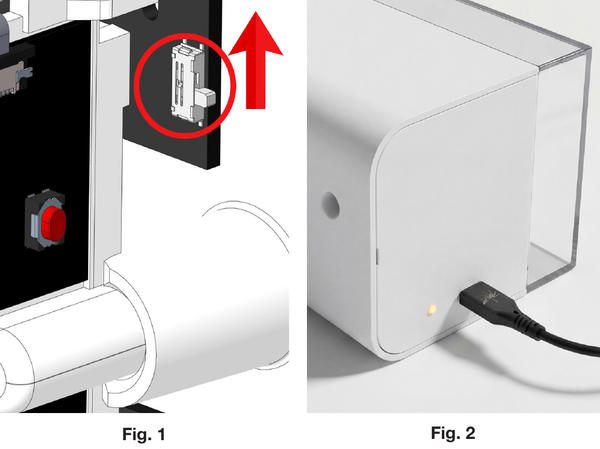
- Switch the clock on by moving the switch upward (Fig. 1). The switch is very small and located on the side of the electronics card.
- Plug in the USB-C cable to charge it (Fig. 2). The clock is now ready to set.
Setting the time with the app
The app can take a few tries to connect, but it is the best method to try first. The clock sets itself from your phone’s time, so it is also the quickest way to correct the time after a battery runs down or after the clocks change.
Connect the clock to your phone
- Download the Solari Lineadesign app from the App Store or Google Play.
- Make sure your phone's Bluetooth is turned on.
- Give the app the permissions it asks for, including Bluetooth, location and the camera. On an iPhone these are under Settings > Privacy & Security; under Bluetooth, both Lineadesign and Dator60 need to be allowed. Without them the app cannot find the clock.
- Open the side cover and press SELECT on the clock until a red light comes on. The clock can only be found while the light is on.
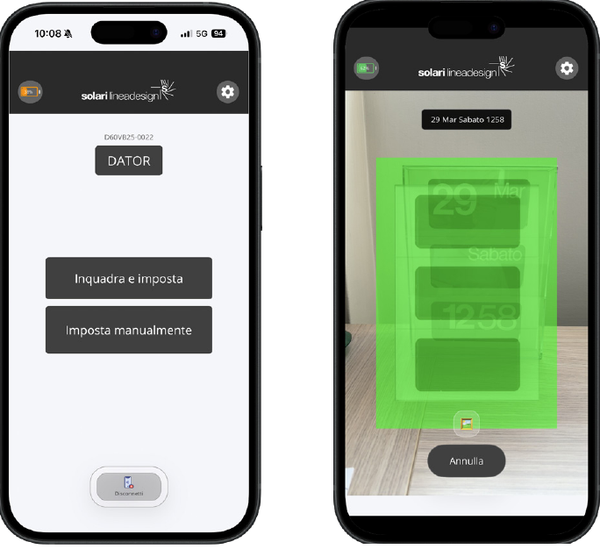
- Open the app and select your Dator.
Point the camera at it (the easier way)
- Choose the camera option. Hold the phone upright for a vertical clock or sideways for a horizontal one, and frame the whole clock face.
- When the outline turns green the app reads the flaps, and the time and date the clock is showing appear on the phone. Confirm, and the clock turns to the correct time.
- Be patient, it may take a couple of tries and then suddenly work. Move a little closer or farther away, exit out of the app section, and retry. Also make sure the clock face is well lit.
Or type it in
- Choose the manual option and enter the date, day and time the clock is showing right now. (Out of the box it shows March 29, Saturday, 12:58, a nod to Solari’s history.) Press Submit and the clock turns to the correct time.
If the app does not update the time on the first attempt, press SELECT again so the light is on and try once more. We have had it work both ways; the camera has been a little more reliable.
Setting the time with the buttons
No phone needed. The clock is set in two passes: first everything is turned back to a fixed starting point, then the real date and time are entered. Inside the side cover are three buttons and a column of small lights:
- SELECT moves between the settings (DAY OF MONTH, MONTH, DAY OF WEEK, HOURS, MINUTES, YEAR). The light next to the current setting comes on.
- NEXT advances the selected setting by one step.
- RESET is used only once, to confirm the starting point.
1. Go to the starting point: January 1, Monday, 00:00
- Press SELECT. The DAY OF MONTH light comes on. Press NEXT until the clock shows 1.
- Press SELECT to move to MONTH and press NEXT until it shows January. Do the same for DAY OF WEEK (Monday), HOURS (0) and MINUTES (00). On the English version, the 0 hour is the 12 with a dot.
- Press SELECT to reach YEAR and press NEXT until the light for the current year is on (table below).
- Press RESET to confirm. The clock now reads January 1, Monday, 00:00.
2. Enter the real date and time
- Use SELECT and NEXT in the same way to set today’s day of the month, month, day of the week, hour (0–23) and minutes. Do not press RESET again.
- Tip: set the minutes about half a minute ahead and finish the last press as the real time catches up.
Year light (the clock only needs to know where this year falls in the leap-year cycle)
- LY: leap year — 2024, 2028, 2032, 2036, 2040, 2044, 2048
- Y1: leap year +1 — 2025, 2029, 2033, 2037, 2041, 2045, 2049
- Y2: leap year +2 — 2026, 2030, 2034, 2038, 2042, 2046, 2050
- Y3: leap year +3 — 2027, 2031, 2035, 2039, 2043, 2047
Daylight saving time
The 2026 model has no + and − buttons. Either open the Solari Lineadesign app and set the clock from your phone (see Setting the time with the app), or set it again with the buttons, which means going back to the starting point first (see Setting the time with the buttons). The app is much quicker. Either way, wait until after the time has changed, not before: the app copies your phone’s current time, so it can only set the clock to the new time once your phone has switched.
Charging
- A full charge lasts about 6 months. Charge with the supplied USB-C cable and a USB-C power adapter of at least 10 W (5 V, 2 A), such as a recent phone charger. Charging takes 6 to 8 hours; the clock keeps running while it charges.
- When the small red light on the side blinks, the battery is low. Charge within about 3 days and the clock keeps its settings. Left longer, it stops and will need to be set again.
- Switching the clock off with the side switch stops the flaps and saves the battery, for example while you are away.
Cleaning
- Dust the case and the clear front with a dry microfiber cloth. That is all it normally needs.
- For fingerprints or smudges on the clear front, use an ammonia-free cleaner made for acrylic and clear plastics. We like Fritz Aquatics Glass & Acrylic Cleaner. Window cleaners and anything with ammonia or alcohol can cloud or craze the plastic.
- Never spray the clock directly. Spray the cloth, wipe, then dry with a clean part of the cloth.
- Keep liquids away from the side cover, the buttons and the USB-C port.
2016 model D-cell / Keypad
Installation
The Dator 60 can stand on a shelf or hang on the wall. Mounting hardware comes in the box (screws, washers, wall plugs and metal brackets). For indoor use only; keep it out of direct sunlight and away from humid rooms.
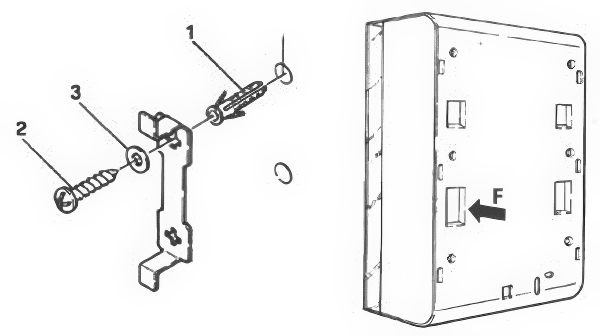
Vertical
- Drill four holes to match the two brackets: 175 mm apart horizontally, 77 mm vertically. Make sure they are level.
- Fit the wall anchors, then the metal brackets, washers and screws. Tighten until the brackets are firm.
- Hang the clock by sliding the brackets into the grooves on the back.
Horizontal
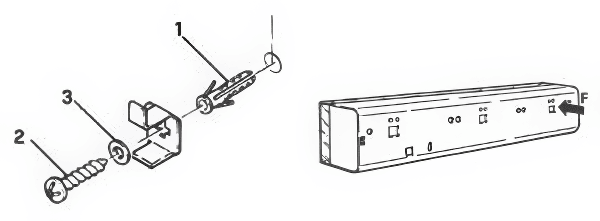
- Drill two holes 524 mm apart. Make sure they are level.
- Fit the wall anchors, then the metal brackets, washers and screws. Tighten until the brackets are firm.
- Hang the clock by sliding the brackets into the grooves on the back.
Before you start: removing the shipping pins and inserting the batteries
The clock ships with pins that hold the flaps still in transit. Remove the pins before switching the clock on. We recommend keeping the box for a month or two until you are certain the clock is working fine. Store the pins in the box. The vertical clock has a pin on one side only; the horizontal clock has pins on both sides.
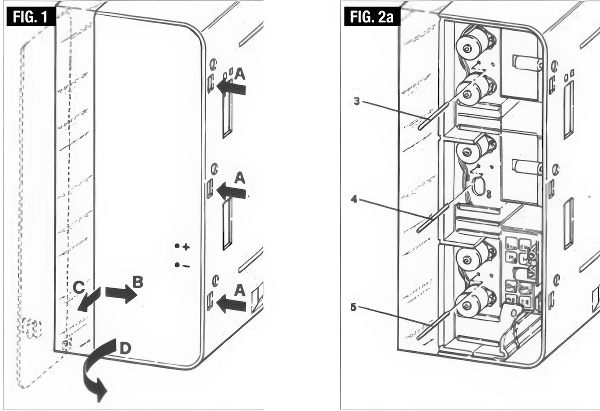
- The cover is on the right side, where the logo is. Press the three levers marked A and push outward, then push the cover back in the direction of arrow B. It opens from the glass side (C and D).
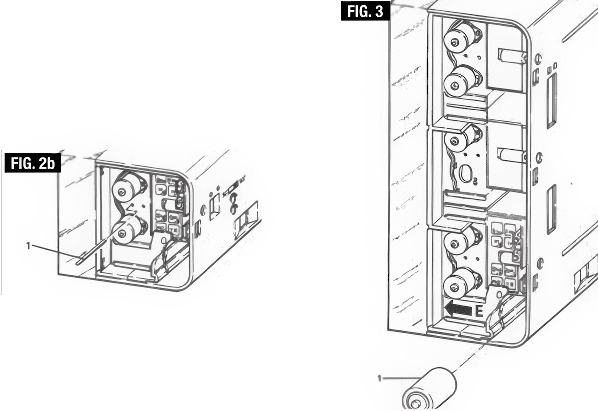
- Remove the pins (Fig. 2a and 2b).
- Insert three D-cell (LR20) alkaline batteries: slide the battery contact all the way toward the glass (arrow E), put the batteries in with the polarity shown on the cover, push them fully home and slide the contact back over the battery. You must do this to complete the circuit. The clock beeps when the batteries are in correctly.
- Expect the batteries to last about a year, sometimes less. Our current recommendation is Duracell Procell Constant D cells (see Changing the batteries).
- Afterward, close the cover: hook it into the holes, slide it back, line it up with the edge of the glass, slide it forward and press the levers to lock it.
Setting the time
If you remember how to do this without the guide, we are impressed. The short video below walks through every step; skip the pin removal, which only applies to a new clock.
Watch the time-setting video on Vimeo
The keypad is behind the side cover (see opening the side cover). Setting the time takes two passes: first everything is turned back to a fixed starting point, then the real date and time are entered. Each key advances one setting: MO month, DM day of the month, DW day of the week, H hours, M minutes, YR year.
1. Go to the starting point: January 1, Monday, 0:00
- Hold the red Set/Synk key for about a second. The clock beeps and stops.
- Press MO until the month shows January.
- Press DM until the day shows 1.
- Press DW until the day of the week shows Monday.
- Press H until the hours show 0, and M until the minutes show 00. On the English 12-hour version, the 0 hour is the 12 with a dot.
2. Enter the real date and time
- Press the yellow Clear key. One beep. If you do not hear a beep, repeat step 1.
- Press YR. One beep. Then press the key for the current year from the table below. One beep.
- Press MO, DM, DW, H and M until each shows today’s month, day, day of the week, hour (0–23) and minutes.
- Press the red Set/Synk key to confirm. The clock beeps and starts running.
- Close the cover (see above). Keep the shipping pins; one of them is the tool for the + and − buttons.
Year key (the clock only needs to know where this year falls in the leap-year cycle)
- Leap year: press M — 2024, 2028, 2032, 2036, 2040, 2044, 2048
- Leap year +1: press H — 2025, 2029, 2033, 2037, 2041, 2045, 2049
- Leap year +2: press DW — 2026, 2030, 2034, 2038, 2042, 2046, 2050
- Leap year +3: press DM — 2027, 2031, 2035, 2039, 2043, 2047
Changing the time by one hour for daylight saving
Setting the time on the 2016 Dator 60 is a process, but adding or subtracting an hour is simple.
- On the side cover are two small holes marked + and −.
- Using a stiff metal wire, such as one of the shipping pins or a straightened paperclip, press + once in spring to move the clock forward an hour.
- In fall, press − once. The flaps turn forward 23 hours to land one hour earlier; let them run.
Changing the batteries
The 2016 Dator 60 runs on three D-cell (LR20) alkaline batteries. Expect about a year from a set, sometimes less. We recommend Duracell Procell Constant D cells.
- When the clock suddenly starts dropping time (more than a minute or two), change the batteries right away. The internal memory may hold the time for up to about two weeks, but we have not tested how long.
- Do not press + or − to drain the clock first.
- Have the three new cells unwrapped and facing the right way before you start. Open the side cover (see above), pull the old cells and seat the new ones quickly, then slide the contact back over the battery. The clock rides through a short gap on its internal reserve.
- Press M. The flaps should run forward to the correct time and date.
- Only if that fails: take the batteries out and drain the clock by pressing + or −; if it beeps, keep pressing until it stops. Put the batteries back in and set the time from the start (see Setting the time). Let us know if you have trouble.
Cleaning
- Dust the case and the clear front with a dry microfiber cloth. That is all it normally needs.
- For fingerprints or smudges on the clear front, use an ammonia-free cleaner made for acrylic and clear plastics. We like Fritz Aquatics Glass & Acrylic Cleaner. Window cleaners and anything with ammonia or alcohol can cloud or craze the plastic.
- Never spray the clock directly. Spray the cloth, wipe, then dry with a clean part of the cloth.
- Keep liquids away from the side cover and the + and − holes.